
If you’ve never scheduled a chimney inspection, you might wonder what actually happens during the process. Many homeowners assume it’s just a quick visual check, but a professional inspection is much more detailed.
This guide walks through what happens during a chimney inspection, what technicians look for, and why each step matters, especially for homes in the Dallas–Fort Worth, TX area.
What does a chimney inspection include?
A professional chimney inspection includes evaluating the structure, flue liner, firebox, venting, and overall system to ensure safe and efficient operation.
A step-by-step look at the chimney inspection process
Instead of a single check, inspections follow a structured process designed to uncover both visible and hidden issues.
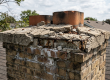
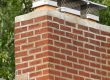
Step 1: Exterior chimney evaluation
The inspection begins with the exterior of the chimney.
Technicians look for:
- Cracked or damaged bricks
- Deteriorating mortar joints
- Leaning or structural shifting
- Chimney crown cracks
- Missing or damaged chimney caps
Exterior issues often indicate deeper structural or water-related problems.
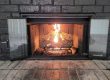
Step 2: Interior firebox inspection
Next, the firebox (where the fire burns) is examined.
This includes checking for:
- Cracked fire bricks or panels
- Signs of heat damage
- Soot or creosote buildup
- Proper condition of interior materials
Damage in the firebox can affect safety and heat containment.
Step 3: Flue liner assessment
The flue liner is one of the most important components of the chimney system.
Technicians inspect for:
- Cracks or gaps in the liner
- Blockages or obstructions
- Creosote accumulation
- Signs of deterioration
In some cases, a camera inspection may be used for a more detailed view.
Step 4: Venting and airflow check
Proper airflow is essential for safe fireplace operation.
During this step, technicians evaluate:
- Draft performance
- Airflow efficiency
- Potential blockages
- Venting system condition
Poor airflow can cause smoke to enter the home or prevent proper combustion.
Step 5: Creosote and soot evaluation
For wood-burning fireplaces, buildup is a key focus.
Technicians assess:
- Level of creosote accumulation
- Thickness and stage of buildup
- Presence of soot deposits
This helps determine whether chimney cleaning is needed.
Step 6: Chimney components and connections
Other important components are also inspected, including:
- Damper functionality
- Flashing at the roofline
- Smoke chamber condition
- Gas connections (for gas fireplaces)
These elements ensure the entire system works together safely.
Step 7: Safety and performance assessment
After reviewing all components, the technician evaluates the overall condition of the chimney system.
This includes:
- Identifying safety concerns
- Noting any code or compliance issues
- Recommending repairs or maintenance
- Determining if the fireplace is safe to use
How chimney inspections are categorized
Not all chimney inspections are the same. The type of inspection depends on the condition of the system, recent changes, and whether any issues are suspected.
Instead of thinking of inspections as “better or worse,” they are designed for different situations and levels of detail.
Basic inspection (Level 1)
This is the standard inspection used for routine maintenance.
It focuses on readily accessible areas of the chimney and fireplace to confirm everything is operating safely and as expected. This type of inspection is typically recommended for annual checkups when no major changes or problems are present.
Expanded inspection (Level 2)
This inspection goes deeper than a routine check and is used when there’s a reason to take a closer look.
It is commonly performed after:
- Severe weather or chimney damage
- Buying or selling a home
- Making changes to the fireplace or venting system
This level often includes specialized tools like video scanning to examine areas that aren’t visible during a basic inspection.
Comprehensive inspection (Level 3)
This is the most detailed type of inspection and is only used when a serious issue is suspected.
It may involve accessing concealed areas of the chimney structure to fully evaluate potential hazards. This level is typically recommended when there are signs of structural damage, safety concerns, or unresolved problems that require deeper investigation.
How long does a chimney inspection take?
Most chimney inspections take 45 minutes to 1 hour, depending on the condition of the system and accessibility.
More detailed inspections may take longer if additional evaluation is needed.
Why chimney inspections are important in Dallas–Fort Worth
Chimneys in North Texas are exposed to:
- Heavy rain and storm systems
- Rapid temperature changes
- Humidity and moisture intrusion
- Seasonal fireplace use
These conditions can create hidden issues that only a professional inspection can detect.
When should you schedule a chimney inspection?
Chimneys should be inspected:
- At least once per year
- After major storms
- When performance issues arise
- Before heavy seasonal use
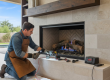
Chimney inspection services in Dallas–Fort Worth, TX
A professional inspection ensures every part of your chimney system is evaluated thoroughly.
At Fireworx Fireplace & Chimney, technicians follow a detailed inspection process to identify issues early and recommend the right solutions.
Services include:
- Chimney inspections
- Chimney cleaning
- Fireplace and chimney repairs
- Venting and airflow evaluations
- Safety assessments
Fireworx serves homeowners across Dallas, Fort Worth, Plano, McKinney, Denton, Frisco, and surrounding DFW communities.
Know What to Expect Before You Schedule an Inspection
Understanding what happens during a chimney inspection helps you make informed decisions about maintaining your fireplace. Regular inspections are one of the most effective ways to prevent hidden damage and ensure safe operation.
Fireworx Fireplace & Chimney provides thorough, professional chimney inspections across the Dallas–Fort Worth, TX area—schedule your inspection today and keep your fireplace system operating safely and efficiently.